This year is going to be a great year for me. It's my last six months of my twenties and come June, BOOM! I'll be flirty thirty. I've got some great goals lining up too. My main squeeze and I just bought our first house together and while I found myself purging A LOT of stuff (lots of yarn and fabric, it had to be done) now I get to buy and make a whole new round of stuff! We've already updated the bathroom and it looks so much better! Pictures and details later though, this is a goals post.
I know it seems cliche to say that I'm going to lose weight as a resolution but lucky me I started my "become a healthier Robin" journey back on December 19! I've already found that with increased movement (just walking) and decreased caloric intake (no more bags of chips) I have already lost 6 pounds. It's hardly been a demanding lifestyle change. And while I feel that age and weight are only numbers and that they don't defy you, it hurt when my doctor's office labeled me 'obese' because I refuse to believe that I am. When according to the wack bmi scale I truly am. But so many great things will come from this. And already have. I've increased my sleeping and water intake too and my energy levels are crazy high, and my skin looks great. So I plan on sharing links and recipes that I'm finding I'm in love with.
I'm assuming with losing the amount I want to lose (about 30 pounds?) that some of my sweaters might become too large. This makes me a bit sad, but it means that I can start to knit smaller sweaters which will require less yarn and will be cheaper to make! Bwhahaha! I already have yarn in hand ready to knit Miranda. I bought it (Berroco Vintage) on a short day trip to Louisville at Sophia's Fine Yarn Shoppe. If you find yourself in the area, I highly recommend it because it's filled with wonderful yarn! A great variety :) I also bought some neon yellow Plymouth yarn to make my dad a hazard hat. haha He's an electrician and while I'm not sure he'll actually wear it I'm going to love knitting it. I also visited A Yarn Crossing, a brand new, just opened store in Louisville. It's smaller than Sophia's but it's loaded with charm and helpful staff. I bought a lovely skein that will become a hat to match my current wip, "How Cold Is It?" mittens.
Another goal that I really hope to accomplish this year - become fluent in French. I've been learning French for over ten years. I took two years in high school, loved it, but then went to a vocational school where it wasn't offered. I've been dipping my toes in here and there but never jumped all in. I finally broke down and bought Rosetta Stone. I saw a Groupon that I couldn't pass up, my arm was hardly being twisted haha. I've gotten through the first lesson and I'm almost done with the second. My review so far? It's great. I remembered a few of the words and phrases from before but it's taught me so much more and I already feel like I'm excelling. :)
So I really kinda jumbled this whole post up but to summarize, Goals: Become a healthier weight, Knit more sweaters, hats and gloves, and become fluent in French. OH and I didn't really mention it but a lot of my walls are blank in my new home so probably getting some great artwork up. :)
Wish me luck!
Monday, January 12, 2015

Monday, April 1, 2013
Sweaters & Sweatshirts from 2011- 2013!
As promised!! I'm trying to post them in completion order. Here's the first one that didn't get added in my 2011 updates.


I made this with Loops and Threads (Michaels brand) Charisma. It's 100% Acrylic and super soft. The sweater pattern is called "Oatmeal Pullover" and can be found on Ravelry. I love this sweater, it's really warm. I wear it when I know I'm going to be cold. It isn't for a mild fall or spring day. :)

Again, made with Charisma. I made this to look like Phineas' shirt that he wears in Phineas and Ferb. One of the best cartoons on tv!!! Also used the Oatmeal pullover pattern again :)

Ok, Ok, I know but I really love the Oatmeal Pullover pattern and the Charisma yarn. I timed how long it took me to make this. 12 hours. BOOM. I like how I finally strayed from striping - which the pattern is all one color haha.


Bergen Street Cardigan (pattern on ravelry) This one turned out a little big in the body and I remember struggling with the pattern at times but in the end I think it turned out great! :) Made with Alpaca! And my cat specializes in hugs.

Made a Shrug!! My shrug making skills still needs work, but this is from 1 skein of red heart super saver - it was a birthday present so I felt like making a shrug from it :)


"I heart Aran" sweater. I put a lot of work into this one. It's another one I love! It has hearts and x's and o's in the cables :) The only thing I'd do different, which i might eventually go back and fix, is make it about an inch or two longer, it feels just a bit short in the front. Made with Cascade 220.

This sweatshirt was just a bit too wide and the arms too baggy so I just took it in. Sorry no before picture but I really like it now that it has a more feminine baggy sweatshirt fit. :)

Made in less than 2 weeks this is "Rotation" found on ravelry, I think for free. Side notes about this. The pattern description did not specify to repeat the set of rounds, say it gave a pattern of 5 rows, it didn't say to repeat that 5 times. It should have. I had the yoke done and I had to take it apart to get it to match the pictures. I'm glad I did, it looks fantastic! Also, I did the alternate colors in the bottom ribbing too, the pattern didn't call for that. The pictures on the right are color accurate.


"Aidez" found it on Ravelry but I think it was a yarn company's pattern. I ended up changing all the cables and adding a seed stitch. lol talk about heavily modified. I also added the wide collar and buttons. I really love how this turned out especially considering all the changes I made, I've never strayed so far from a pattern in knitting when it involved a sweater! The yarn is upcycled from a store bought - but purchased at the thrift store blanket. It's 100% acrylic. And super super warm! I tell people it's like wearing a blanket! Because I am!

I couldn't find the original, but the sweatshirt in the picture was created entirely out of two non hooded sweatshirts. I also added the "The Crew" logo by hand with fabric markers :)

This was a super baggy sweatshirt that I took in, really simple and took maybe 7 minutes. :)
And now a before and after with a look at how I do it!

Ok so the problem with this sweatshirt is really only that the sleeves are too big. The body of the sweater fit really well, even without waist shaping. (taking it in at the natural waist)

Using white thread so you can see, and because I was too lazy to change it, you can see that I simply sewed in enough to get rid of the excess fabric that I didn't need in the sleeve, then because the body fit so well, I kept the seam really close to the side. I could have stopped at the seam of the sleeve to the body but I thought it would look better if there were a matching seam down the side of the body.

You can see that the sleeves are more fitted and the body is still the same, fitted body.
Hopefully tomorrow I can keep up the trend of catching up and share my headwear and t-shirt surgeries?
Sunday, March 31, 2013
Dresses! I'm so ready for summer!
I have been very busy crafting since I last updated! And to not make a huge post to catch up over probably 200 projects I'll just post and share as I see fit. The last month or so I've been re-working a lot of dresses. I'm itching for summertime so it's currently my only outlet because the summer sweater I'm working on is taking forever. It's a beautiful sea foam cotton and I'm working Kate Davie's (Get off) My Cloud sweater. :D


This dress I bought from the thrift store for 29 cents. It was see through and had shoulder pads and was just super ugly. I hacked off the top right underneath the top button you see, seam ripped the bottom of the sleeves to create what became the new straps, I created a casing at the top of the dress for elastic to go through, and added a wide ribbon for a belt/band. Then since it was see through I took a twin sized bedsheet and cut it up to use as a liner and sewed it in using the same sewing line as the one that created the casing for the elastic. I love this dress so much. It really transformed and now it's the dress it deserves to be!

I made the majority of the dress 2-3 summers ago for the Fourth of July. It was just the bottom part and the triangle tops. The picture of the back is what was added this time around. The fabric is an old bedsheet. I really liked this dress for what it was - a summer, I'm at the pool/beach dress, but I wasn't really finding myself at the beach or pool and decided it was time to either get rid of it or make it work for more of a daily wear. So I added the top section and decided I liked it underneath the triangle tops. I had planned on getting rid of the triangle top entirely but then it seemed like more work than it was worth especially because I liked the new top underneath. I drafted the pattern for the new top by looking at a fancy dress I had :)

I had started this dress around 4 years ago, thought I was done and asked my boyfriend at the time what he thought, I remember being disappointed by whatever his answer was and decided to scrap the dress entirely and I put it away with my fabric. I randomly found it last month and put it on just for the 'hey' of it and I wasn't sure what he had made me hate it for. I literally only added the halter strap that goes into down and across my back and around to the front for a bow and I love it. The dress you see now use to be the bottom skirt part of a very amish looking dress. It had a collar and sleeves and was very unattractive. Now it's scandalous!

I got this one from a thrift store for $4.99. I found out last week it's being sold new right now at a local department store for $20.00 I have to admit, I like my after version way more. There's some shirring that use to be in the middle, I cut off the top to make the shirring be the top and I left enough room to create a casing so I could run elastic through the top of it. I took the elastic from the sleeves for this. The straps are what's leftover of the sleeves and the band/belt came from the top of the top section which had been elastic'd. Now it's that perfect tea length dress we all love in the summer time! :)

And I just created this today! It was a $2.99 dress from the thrift store. I took about 3 inches off the top and then 6 inches off the bottom. With the bottom section I cut off both ends enough fabric to create puffy sleeves and then left the rest to be part of the sash belt. I also obviously lowered the neckline :) This one and the purple one are contending for my favorite. ALSO this is a bright peach, my bathroom lighting and my camera just weren't jiving tonight. :)
And lastly I think I'll share my Cincinnati Red's headband because tomorrow is opening day and I'll be wearing it proudly and eating peanuts, cracker jacks and big league chew! :)

It was pretty simple to make. I'm going to make more for my sister so when I do that I'll make sure to write down how I did it :) Go Reds!
Hopefully I'll be able to get on tomorrow and share sweatshirts and sweaters I've knitted/sewn!
Tuesday, October 25, 2011
How do they do it?
I've been laid off for about a month, and with that time I have looked and looked and looked for a new job, finally have one and will be starting next week (yay!!) and I've managed to create a tumblr, and start Nerd Wars on Ravelry AND begin to make items to be sold in my etsy store that I've had for like 3 years. All of this said, how do these crafty gurus online do it all? How do they have a pristine blog, website, and etsy selling accounts?! Being laid off hasn't seemed to give me that much more time for knitting and the such.
And I'm off to get ready to pick up my packet from City BBQ for Run Like Hell.
I will make a massive update with all my updated 100 projects thus far - I believe I'm like on project 79. So I haven't kept up with updating the world... One day I will be the internet crafting guru like these other crafty people.
And I'm off to get ready to pick up my packet from City BBQ for Run Like Hell.
I will make a massive update with all my updated 100 projects thus far - I believe I'm like on project 79. So I haven't kept up with updating the world... One day I will be the internet crafting guru like these other crafty people.
Wednesday, August 3, 2011
Paper Droids!
What a month! I finished paper dolls or should I say Paper Droids! And I've started and about half way through my robot backpack. :) I'm excited. I'm not excited however at my growing list of my car needs this as opposed to my growing list of I want these needles. *sigh. And with Boston quickly approaching and not everything being paid for yet, I'm feeling slightly frazzled. I have to remind myself that it isn't entirely my fault as to why things have ended up this way, I didn't know/plan for my car to need a new battery, and for VW to take a week to figure that out. I should have gotten new tires a long time ago but I haven't yet, I hope they can last another month, because I won't have any money for them. THAT or I'll be sleeping in a car instead of in a hotel. That could prove to be interesting. *sigh sigh sigh. It's all I do. I'm also finally home after not being here for what has felt like weeks. Tomorrow I will do laundry and then I've promised myself the whole weekend to get things done. AND AND AND The Phineas and Ferb movie is Friday. I'm so excited :) I'm going to make sugar cookies in celebration! AND I'm overwhelmingly poor so I will have a feast of romen noodles - or Robin noodles as I like to refer to them - and popcorn for the next month. Good thing my mother feeds me lunch throughout the week. She's the best. :) I might even decided to stay at my parents place - planned not unplanned like it's been - to save on some gas since they're like a mile from work. :)
I have complete faith that everything in my life that I'm feeling unsure about will work out. Some things already have. :)


And after blocking! I'll take better pictures and update on my 100 projects later, I need to get back to cleaning but I wanted to update about this! :)
I have complete faith that everything in my life that I'm feeling unsure about will work out. Some things already have. :)

This is an accurate color picture, but before blocking and before adding buttons to C3PO's chest. :) Doesn't it look great?

And after blocking! I'll take better pictures and update on my 100 projects later, I need to get back to cleaning but I wanted to update about this! :)
Thursday, July 7, 2011
Re Starting Paper dolls!
So, I'm back at it on Paper Dolls :) I know my gauge is off, even if it wasn't I think I'd still be concerened about it fitting around my bust. I'm a 34DD. Such a ridiculous size. My waist measures at 31 inches, and then my chest is 38" Talk about serious increasing and decreasing. I'll be surprised if my sweater looks as nice as the other ones on ravelry.


After about an hour, I've accomplished an inch. So theoretically if I stay at this pace, and make the garmet 27 inches long (guess) I have another 30+ hours ahead of me. Yay! lol :)
I also need to pick up my umbrella and socks again. Those might just be put off until Boston or something. :)
Projects 51-53
So Project 51 was made with another 3 projects but I don't have pictures of those yet, so for now I just give you one necklace instead of 4. :)


Well I should get to working work. And I have almost finished another captain america headband for my sister and I want to make her another headband with just a bow before I mail her scarf off tomorrow, So I can mail those also :)
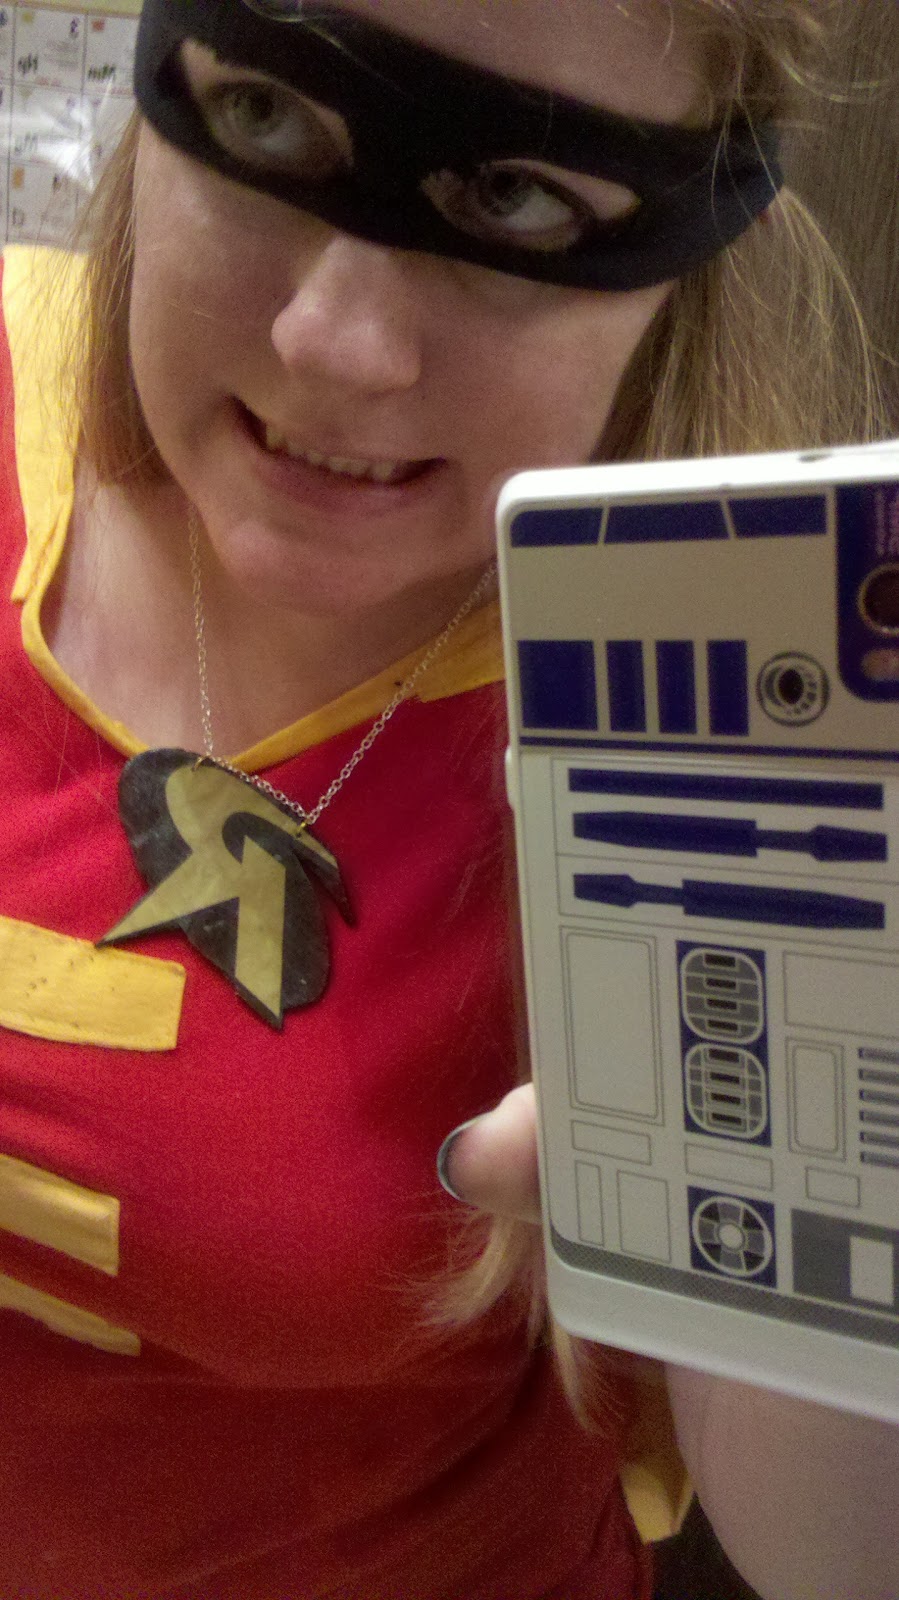
And Yes, I decided to put on my Robin costume just for the picture. lol. :) I made it using Max California's pdf tutorial found here. It was fun! Angie and I got together last Friday and made these :) I also have an "I love Brian" one, a <3 Knit knitting one, and an "I love Sewing" one. Angie made a Captain America one and a knitting one. We used sculpey and mod podge. And jump rings that are super colorful. :)

Project 51 - Julie's last minute Ravenclaw scarf! I need to hurry up and get this in the mail tomorrow!! But even though it took me longer than my projected 10 days I think it turned out great! It only took 1 skein of Red Heart Super Saver Royal Blue for the whole thing too! So yay $3 scarf! This scarf was knit in 1 X1 ribbing and measures about 5 feet long. I have 9 sections - Blue, grey, blue, grey, repeat, and ended with another 18 rows of blue to make it uniform on both ends. I only casted on 42 sts and used size 8's instead of the recommended 6's. I think that's what they used. :) I'm pretty satisfied with this, and I think I might make some more scarves just also work on other things since they get so repetitive and boring.


I decided to just to take pictures with the variety of ways the scarf could be worn, since after 6 inches it's all the same. :)

Project 53 - House Brawl shirt from Threadless resize. This was a simple resize and didn't take much time. (30 minutes?) I think it looks amazing! Threadless didn't offer this shirt in the female size of my choice when I bought it, so I bought a Men's Large. Which is great because it gives me the extra room in the chest that I need and then the length. I did bring up the neckline and brought the sleeves in, and added a pucker for a puff sleeve. :) And shaped a bit for the waist but I didn't go crazy, maybe only brought it in a total of 2-3 inches. I like that this resize the shirt is a little looser than tighter, I usually resize it to fit like a glove but this is a nice change :)

Pucker sleeves for puffiness!
Well I should get to working work. And I have almost finished another captain america headband for my sister and I want to make her another headband with just a bow before I mail her scarf off tomorrow, So I can mail those also :)
Subscribe to:
Posts (Atom)